GitOps for Service Mesh: an ArgoCD plus Linkerd Walkthrough


October 14, 2026
Why choose GitOps for service mesh?
Imagine that you need to deploy the Linkerd service mesh. You get to the point of the install where you run the following kubectl command:
linkerd install | kubectl apply -f - While that could successfully deploy Linkerd, it could lead another team member to ask the following questions:
- Which Linkerd version was installed?
- Which certificate files were supplied?
- Which optional components were enabled?
With GitOps, the answers are stored in Git. Your Git repository contains the Linkerd version, certificate files, and other components in a trackable form for team members to view and edit. The term GitOps is widely described as representing a system's desired state in files stored in a Git repository that are deployed to needed systems.
In this post, we'll use this operations strategy to manage our Linkerd deployment using one Git repository, a shared trust anchor, cluster-local issuers, and a repeatable deployment process. We’ll deploy Linkerd to two remote Kubernetes clusters (named k3d-cluster-a and k3d-cluster-b) using Argo CD running on our management cluster (named k3d-management), Sealed Secrets, cert-manager, and trust-manager. There will be some initial bootstrapping of our cluster resources using kubectl commands, but we'll eventually be able to manage those resources using Argo CD.
Prerequisites and required CLI tools for Linkerd GitOps
You’ll need several CLI tools to follow the guide:
- Linkerd, from https://github.com/linkerd/linkerd2/releases;
- Argo, from https://github.com/argoproj/argo-cd/releases;
- K3D, from https://github.com/k3d-io/k3d/releases;
- Docker, from https://docs.docker.com/engine/install/;
- Kubectl, from https://kubernetes.io/docs/tasks/tools/;
- Kubeseal, from https://github.com/bitnami/sealed-secrets/releases; and
- Step, from https://smallstep.com/docs/step-cli/installation.
Step-by-step guide: Creating and starting K3D Kubernetes clusters
I'll be using a single computer with the IP address 192.168.0.2 to run all three Kubernetes clusters and access the Argo CD web interface. Please adjust the IP to a value that fits your environment. If you're using a tool like Docker Desktop or Orbstack, you may need to run
docker inspect --format '{{(index .IPAM.Config 0).Gateway}}' k3d-gitops-networkto find the appropriate IP for accessing the Argo CD web interface.
# Create the k3d-gitops-network docker network
docker network create k3d-gitops-network

# Create the k3d-management cluster
k3d cluster create management --network k3d-gitops-network --api-port 192.168.0.2:6445 --k3s-arg "--tls-san=192.168.0.2@server:0" --port "192.168.0.2:83:80@loadbalancer"

# Create the k3d-cluster-a cluster
k3d cluster create cluster-a --network k3d-gitops-network --api-port 192.168.0.2:6446 --k3s-arg "--tls-san=192.168.0.2@server:0" --port "192.168.0.2:81:80@loadbalancer"

# Create the k3d-cluster-b cluster
k3d cluster create cluster-b --network k3d-gitops-network --api-port 192.168.0.2:6447 --k3s-arg "--tls-san=192.168.0.2@server:0" --port "192.168.0.2:82:80@loadbalancer"

# Set your kubernetes context back to the management cluster
kubectl config use-context k3d-management
How to install and configure Argo CD for multicluster management
For demonstration purposes, we'll install Argo CD using the multi-tenant, non-high-availability options. While logged into the management cluster, run the following commands:
# Create the Argo CD namespace
kubectl create namespace argocd

# Install latest stable release of Argo CD
kubectl apply -n argocd --server-side --force-conflicts -f https://raw.githubusercontent.com/argoproj/argo-cd/v3.5.2/manifests/install.yaml

 # Retrieve the admin password
 admin_password=$(kubectl -n argocd get secret argocd-initial-admin-secret -o jsonpath='{.data.password}' | base64 -d)

# Create port forward
kubectl -n argocd port-forward svc/argocd-server --address 0.0.0.0 8080:443 > /dev/null 2>&1 &

# Login to Argo CD via the command line
argocd login localhost:8080 --insecure --username admin --password $admin_password

# Print the Argo CD admin password to the screen
kubectl -n argocd get secret argocd-initial-admin-secret -o jsonpath="{.data.password}" | base64 -d
In a web browser, navigate to
https://<computer_IP>:8080to access the Argo CD web interface.
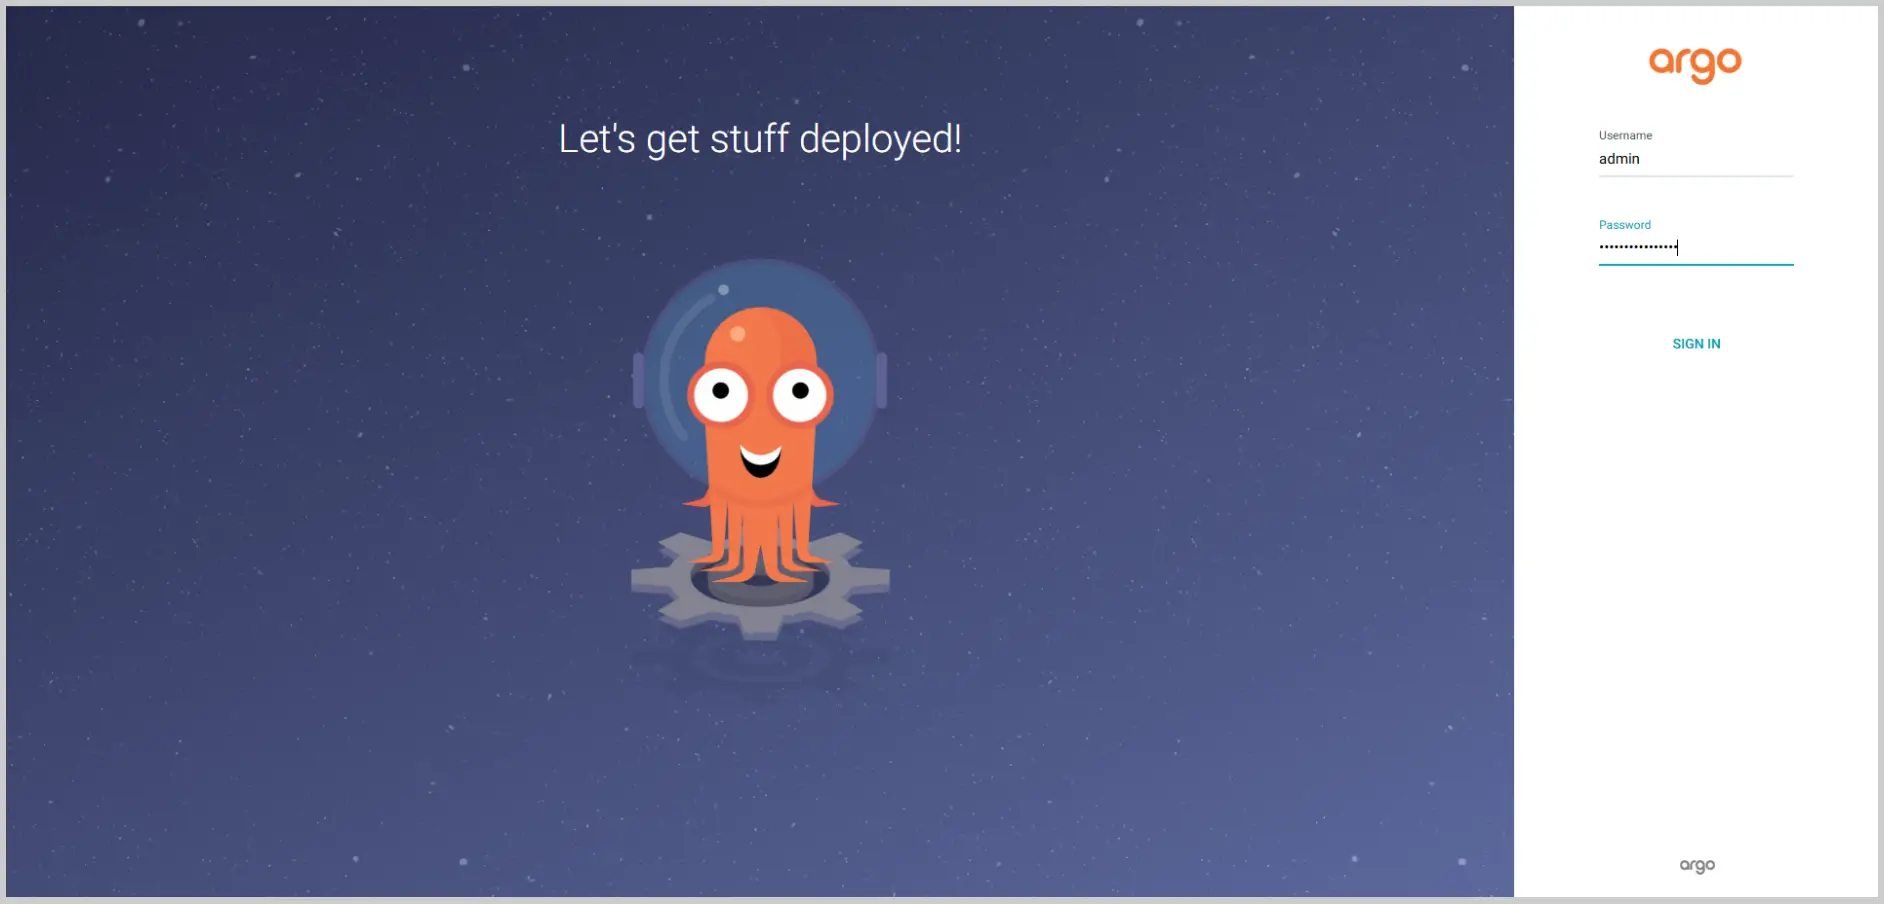
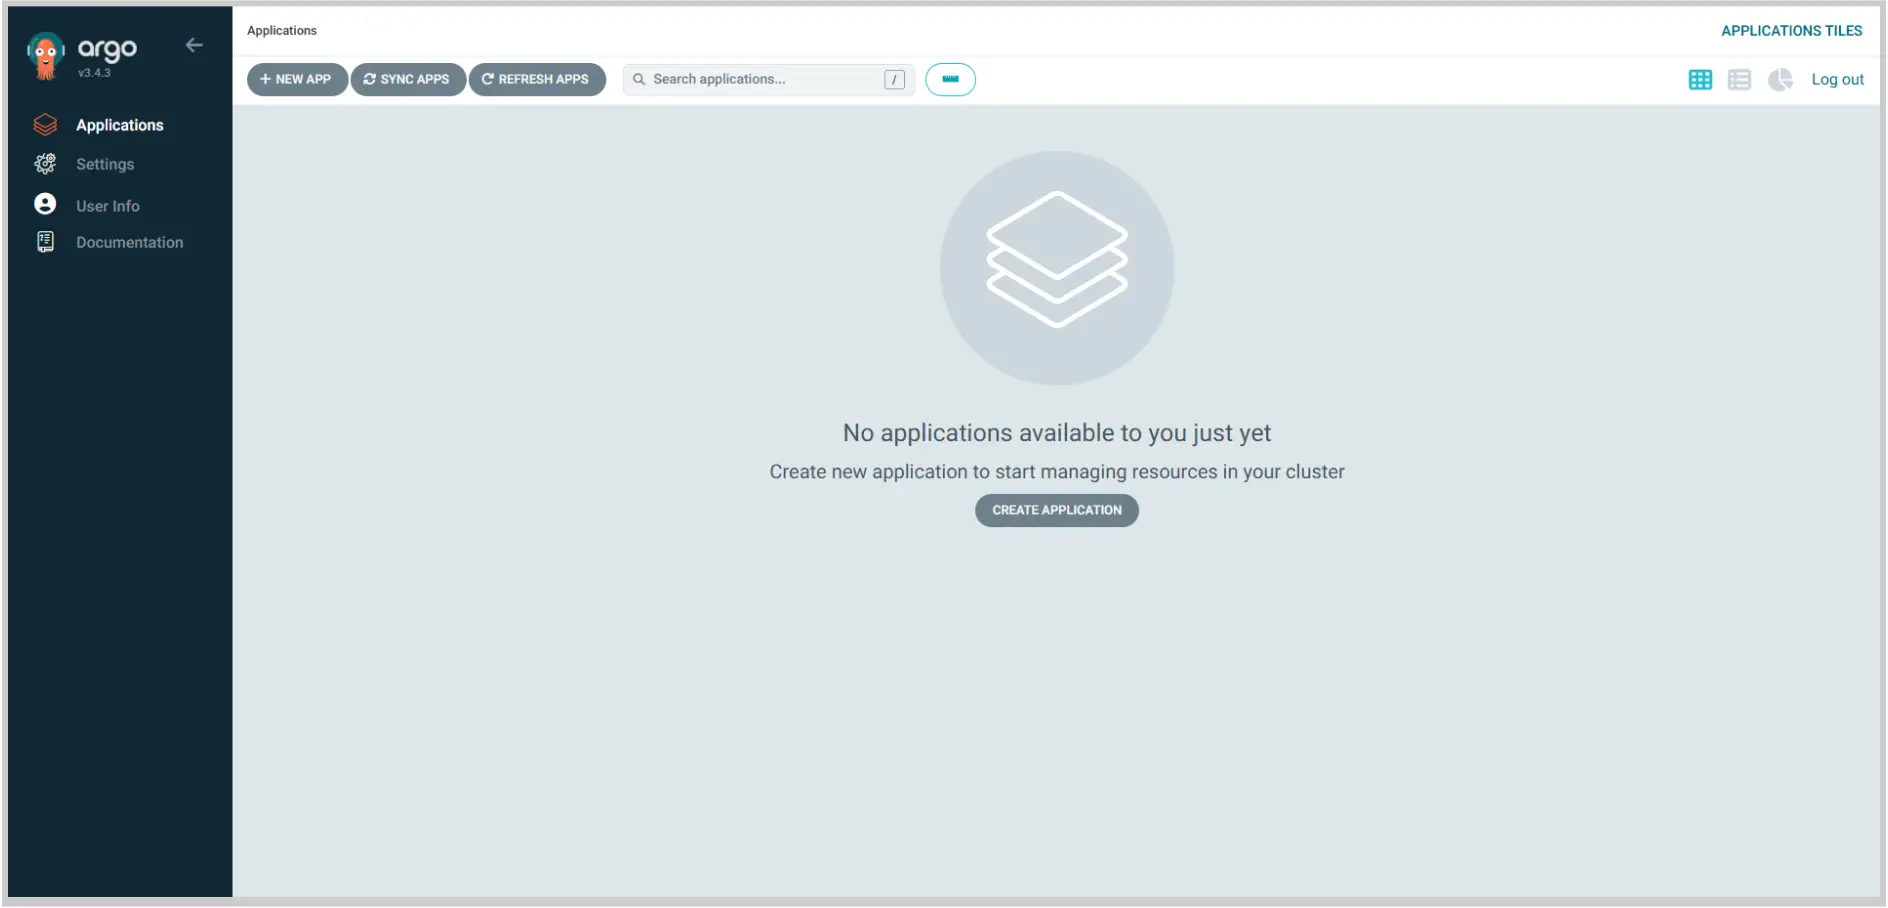
You should see Argo CD running with no applications deployed.
Registering remote Kubernetes clusters in Argo CD
Let's list our kubeconfig contexts to identify our clusters:
$ kubectl config get-contexts
CURRENT   NAME                     CLUSTER                  AUTHINFO                       NAMESPACE
          k3d-cluster-a            k3d-cluster-a            admin@k3d-cluster-a
          k3d-cluster-b            k3d-cluster-b            admin@k3d-cluster-b
*         k3d-management           k3d-management           admin@k3d-management
In each remote cluster, create a service account and RBAC settings that will allow Argo CD to connect as a cluster-admin.
# Set your kubernetes context to the k3d-cluster-a cluster
kubectl config use-context k3d-cluster-a
kubectl apply -f - <<EOF
apiVersion: v1
kind: ServiceAccount
metadata:
  name: argocd-manager
  namespace: kube-system

---
apiVersion: rbac.authorization.k8s.io/v1
kind: ClusterRoleBinding
metadata:
  name: argocd-manager-binding
roleRef:
  apiGroup: rbac.authorization.k8s.io
  kind: ClusterRole
  name: cluster-admin
subjects:
  - kind: ServiceAccount
    name: argocd-manager
    namespace: kube-system

---
apiVersion: v1
kind: Secret
metadata:
  name: argocd-manager-token
  namespace: kube-system
  annotations:
    kubernetes.io/service-account.name: argocd-manager
type: kubernetes.io/service-account-token
EOF
On the management cluster, add the remote clusters to Argo CD to allow for declarative GitOps management. Note that we're setting a label (linkerd=enabled) on the remote clusters to allow our code to easily target them. This is helpful when deploying certain resources to specific Kubernetes clusters using Argo CD ApplicationSets.
kubectl config use-context k3d-management
argocd cluster add k3d-cluster-a --service-account argocd-manager --label linkerd=enabled --yes
argocd cluster add k3d-cluster-b --service-account argocd-manager --label linkerd=enabled --yes
After adding the cluster, you can verify the connection status using the web interface:
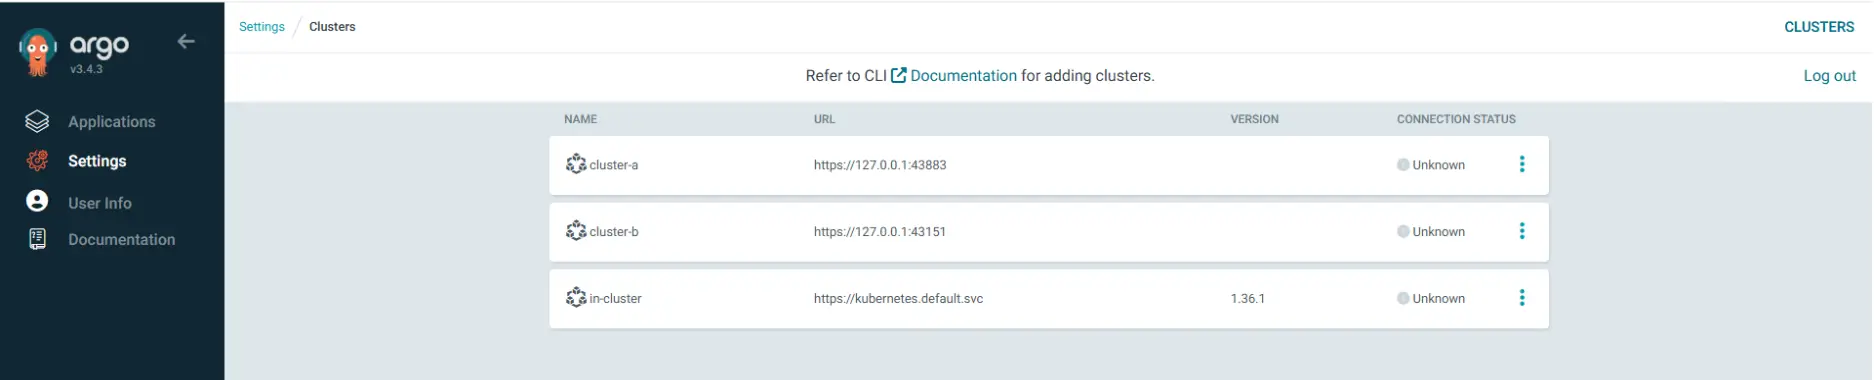
Or using the command line:
argocd cluster list
The message "Cluster has no applications and is not being monitored" indicates that the Kubernetes cluster is successfully connected, but currently does not have any Argo CD Applications deployed to it. Once an Application is deployed, the "Unknown" value under "Status" will be updated.
Argo CD Applications, ApplicationSets, and App-of-Apps
Below are quick explanations of some of the Argo CD features we'll be using in our deployments.
Application: A group of Kubernetes resources as defined by a manifest. It is defined by two key pieces of information:
- Source reference to the desired state in Git (repository, revision, path, environment)
- Destination reference to the target cluster and namespace. For the cluster one, server or name can be used, but not both (which will result in an error). Under the hood when the server is missing, it is calculated based on the name and used for any operations.
ApplicationSet: An ApplicationSet used to deploy the same application structure across many clusters. Using ApplicationSets gives us the power and efficiency of the App-of-Apps pattern.
App-of-Apps: A structural strategy where a single root application (parent) manages multiple child applications.
Sync Wave: Setting a numerical value for the Argo CD argoproj.io/sync-wave annotation allows Argo CD to deploy resources in a specific order.
Deploying Initial ApplicationSets and Prerequisite Operators
Before deploying the Linkerd control plane or the Linkerd certificates, we'll need to deploy a few prerequisite operators that will allow for their use within the remote clusters. Let’s create the directory structure to store our ApplicationSets.
mkdir -p applicationsets/{cert-manager,gateway-api,linkerd-certificates,linkerd-control-plane,linkerd-crds,sealed-secrets,trust-manager}The applicationsets/cert-manager/cert-manager.yml manifest defines the cert manager deployment.
kind: ApplicationSet
metadata:
  name: cert-manager
  namespace: argocd
  annotations:
    argocd.argoproj.io/sync-wave: "0"
spec:
  generators:
    - clusters:
        selector:
          matchLabels:
            linkerd: "enabled"
  template:
    metadata:
      name: 'cert-manager-{{name}}'
    spec:
      project: default
      source:
        repoURL: https://charts.jetstack.io
        chart: cert-manager
        targetRevision: v1.21.0
        helm:
          parameters:
            - name: installCRDs
              value: "true"
          values: |
            prometheus:
              enabled: false
      destination:
        server: '{{server}}'
        namespace: cert-manager
      syncPolicy:
        automated:
          prune: true
          selfHeal: true
        syncOptions:
          - CreateNamespace=true
          - ServerSideApply=true
The applicationsets/gateway-api/gateway-api-crds.yml manifest defines the gateway-api-crds deployment.
apiVersion: argoproj.io/v1alpha1
kind: ApplicationSet
metadata:
  name: linkerd-crds
  namespace: argocd
  annotations:
    argocd.argoproj.io/sync-wave: "0"
spec:
  generators:
    - clusters:
        selector:
          matchLabels:
            linkerd: "enabled"
  template:
    metadata:
      name: 'linkerd-crds-{{name}}'
    spec:
      project: default
      source:
        repoURL: https://github.com/linkerd/linkerd2.git
        targetRevision: edge-26.8.3
        path: charts/linkerd-crds
      destination:
        server: '{{server}}'
        namespace: linkerd
      syncPolicy:
        automated:
          prune: true
          selfHeal: true
        managedNamespaceMetadata:
          labels:
            trust-target: "linkerd"
        syncOptions:
          - ServerSideApply=true
The applicationsets/linkerd-crds/linkerd-crds.yml manifest defines the linkerd-crds deployment.
apiVersion: argoproj.io/v1alpha1
kind: ApplicationSet
metadata:
  name: sealed-secrets
  namespace: argocd
  annotations:
    argocd.argoproj.io/sync-wave: "0"
spec:
  generators:
    - clusters:
        selector:
          matchLabels:
            linkerd: "enabled"
  template:
    metadata:
      name: 'sealed-secrets-{{name}}'
      namespace: argocd
    spec:
      project: default
      source:
        repoURL: https://bitnami.github.io/sealed-secrets
        chart: sealed-secrets
        targetRevision: 2.18.6
        helm:
          releaseName: sealed-secrets
      destination:
        server: '{{server}}'
        namespace: kube-system
      syncPolicy:
        automated:
          prune: true
          selfHeal: true
        syncOptions:
          - CreateNamespace=true
          - ServerSideApply=true
The applicationsets/sealed-secrets/sealed-secrets.yml manifest defines the sealed secrets deployment.
apiVersion: argoproj.io/v1alpha1
kind: ApplicationSet
metadata:
  name: trust-manager
  namespace: argocd
  annotations:
    argocd.argoproj.io/sync-wave: "1"
spec:
  generators:
    - clusters:
        selector:
          matchLabels:
            linkerd: "enabled"
  template:
    metadata:
      name: 'trust-manager-{{name}}'
    spec:
      project: default
      source:
        repoURL: oci://quay.io/jetstack/charts/trust-manager
        targetRevision: "0.24.0"
        chart: trust-manager
        helm:
          releaseName: trust-manager
          values: |
            app:
              trust:
                namespace: cert-manager
      destination:
        server: '{{server}}'
        namespace: cert-manager
      syncPolicy:
        automated:
          prune: true
          selfHeal: true
        syncOptions:
          - ServerSideApply=true
The applicationsets/trust-manager/trust-manager.yml manifest defines the trust manager deployment.
apiVersion: argoproj.io/v1alpha1
kind: Application
metadata:
  name: linkerd
  namespace: argocd
  finalizers:
    - resources-finalizer.argocd.argoproj.io
spec:
  project: default
  source:
    repoURL: https://<your_repository>/linkerd.git
    targetRevision: main
    path: applicationsets
  destination:
    server: https://kubernetes.default.svc
    namespace: argocd
  syncPolicy:
    automated:
      prune: true
      selfHeal: true
Create the management-cluster/management-cluster.yml manifest to deploy an Argo CD Application to our management cluster that will watch the applicationset directory for changes.
apiVersion: argoproj.io/v1alpha1
kind: Application
metadata:
  name: linkerd
  namespace: argocd
  finalizers:
    - resources-finalizer.argocd.argoproj.io
spec:
  project: default
  source:
    repoURL: https://<your_repository>/linkerd.git
    targetRevision: main
    path: applicationsets
  destination:
    server: https://kubernetes.default.svc
    namespace: argocd
  syncPolicy:
    automated:
      prune: true
      selfHeal: true
To install these applications using Argo CD, run the following commands:
git add applicationsets/
git commit -m "add prerequisite operators to assist with Linkerd Control-Plane GitOps deployment"
git push
Next, we'll work through creating the Linkerd certificates.
Generating and managing Linkerd certificates and trust anchors
Both clusters need to sync the same trust anchor certificate. The trust anchor public tls.crt file should be the only certificate file committed to Git using a secure mechanism such as a sealed-secret manifest. Rotating the anchor certificate in Git triggers an update from Argo CD in the clusters running Linkerd. For simplicity, the trust anchor private key is also stored inside of the cluster for this guide, however, this is not recommended for a production deployment. Storing the trust anchor private key in an external PKI (such as Hashicorp Vault) and configuring cert-manager to pull it from the external PKI would be a better production solution.
Using the Step CLI, create the trust anchor certificate and key:
mkdir -p pki/trust-anchor
step certificate create root.linkerd.cluster.local pki/trust-anchor/trust-anchor-ca.crt pki/trust-anchor/trust-anchor-ca.key --profile root-ca --no-password --insecure --not-after 43800h
Create the identity issuer certificate and key pair that will be used to sign the Linkerd proxies’ CSR:
mkdir -p pki/identity-issuer

step certificate create identity.linkerd.cluster.local pki/identity-issuer/issuer.crt pki/identity-issuer/issuer.key --profile intermediate-ca --not-after 8760h --no-password --insecure --ca pki/trust-anchor/trust-anchor-ca.crt --ca-key pki/trust-anchor/trust-anchor-ca.key
Secure the trust anchor certificate files using Sealed Secrets
Sealed Secrets will allow us to manage the trust-anchor-ca.crt and trust-anchor-ca.key as a Kubernetes secret in Git without exposing the file values. Argo CD will then be able to securely deploy the trust anchor certificate files to all of our remote clusters running Linkerd. The Sealed Secrets controller in the remote clusters will automatically decrypt the trust anchor secret in the cluster for Linkerd use. We have to run these commands in each cluster as the sealed-secrets controller in each cluster contains its own asymmetric key pair.
Login to each cluster and run the following commands:
# Cluster-A
# Fetch the sealed-secrets controller public key
kubectl config use-context k3d-cluster-a
kubeseal --fetch-cert --controller-name sealed-secrets --controller-namespace kube-system > pki/trust-anchor/k3d-cluster-a/k3d-cluster-a-pub-cert.pem


# Seal the trust anchor certificate files and place them in a sealed-secret manifest
kubectl create secret tls linkerd-trust-anchor \
    --cert=pki/trust-anchor/trust-anchor-ca.crt \
    --key=pki/trust-anchor/trust-anchor-ca.key \
    --namespace=cert-manager \
    --dry-run=client -o yaml |
    kubeseal --format yaml \
      --controller-name=sealed-secrets \
      --controller-namespace=kube-system |
    kubectl patch -f - \
      --type=merge \
      --local -o yaml \
      -p '{"spec":{"template":{"metadata":{"labels":{"linkerd":"enabled"}}}}}' \
      >pki/trust-anchor/k3d-cluster-a/sealed-linkerd-trust-anchor-certificate.yml

# Cluster-B
kubectl config use-context k3d-cluster-b
kubeseal --fetch-cert --controller-name sealed-secrets --controller-namespace kube-system > pki/trust-anchor/k3d-cluster-b/k3d-cluster-b-pub-cert.pem


kubectl create secret tls linkerd-trust-anchor \
    --cert=pki/trust-anchor/trust-anchor-ca.crt \
    --key=pki/trust-anchor/trust-anchor-ca.key \
    --namespace=cert-manager \
    --dry-run=client -o yaml |
    kubeseal --format yaml \
      --controller-name=sealed-secrets \
      --controller-namespace=kube-system |
    kubectl patch -f - \
      --type=merge \
      --local -o yaml \
      -p '{"spec":{"template":{"metadata":{"labels":{"linkerd":"enabled"}}}}}' \
      >pki/trust-anchor/k3d-cluster-b/sealed-linkerd-trust-anchor-certificate.yml

# Set your kubernetes context back to the management cluster
kubectl config use-context k3d-management
Now that the trust anchor certificate has been generated for each cluster, add the trust-anchor-sealed.yml files to your Git repository.
git add pki/trust-anchor/k3d-cluster-a/sealed-linkerd-trust-anchor-certificate.yml pki/trust-anchor/k3d-cluster-b/sealed-linkerd-trust-anchor-certificate.yml
git commit -m "add sealed trust anchor certificate for remote clusters"
git push
The trust anchor files are now in our Git repository. Let’s create an Argo CD Application (in pki/trust-anchor/linkerd-trust-anchor.yml) to deploy the sealed trust anchor certificate to the remote clusters.
apiVersion: argoproj.io/v1alpha1
kind: Application
metadata:
  name: linkerd-trust-anchor
  namespace: argocd
  annotations:
    argocd.argoproj.io/sync-wave: "2"
spec:
  project: default
  source:
    repoURL: https://github.com/org-name/repo-name.git
    targetRevision: main
    path: pki/trust-anchor/{{name}}/sealed-linkerd-trust-anchor-certificate.yml
  destination:
    server: https://kubernetes.default.svc
    namespace: cert-manager
  syncPolicy:
    automated:
      prune: true
      selfHeal: true
Configure cert-manager
Place the following configuration in pki/linkerd-issuers/linkerd-certificate-manifests.yml
# ClusterIssuer that references the Sealed Secret (Trust Anchor)
apiVersion: cert-manager.io/v1
kind: ClusterIssuer
metadata:
  name: linkerd-trust-anchor-issuer
  namespace: cert-manager
  annotations:
    argocd.argoproj.io/sync-wave: "3"
spec:
  ca:
    secretName: linkerd-trust-anchor # Created by Sealed Secrets controller
---
apiVersion: cert-manager.io/v1
kind: Certificate
metadata:
  name: linkerd-identity-issuer
  namespace: linkerd # The Certificate for the Linkerd identity issuer should go in the linkerd namespace, so that the control plane has access to the resulting Secret.
  annotations:
    argocd.argoproj.io/sync-wave: "4"
spec:
  isCA: true
  commonName: identity.linkerd.cluster.local
  secretName: linkerd-identity-issuer
  duration: 48h
  renewBefore: 24h
  privateKey:
    algorithm: ECDSA
    size: 256
    rotationPolicy: Always
  usages:
    - cert sign
    - crl sign
    - server auth
    - client auth
  issuerRef:
    name: linkerd-identity-issuer
    kind: ClusterIssuer
---
# The trust-manager Bundle that will copy the public certificate from the linkerd-trust-anchor secret (in the cert-manager namespace) into a ConfigMap named linkerd-identity-trust-roots in the linkerd namespace.
apiVersion: trust.cert-manager.io/v1alpha1
kind: Bundle
metadata:
  name: linkerd-identity-trust-roots
  namespace: cert-manager
  annotations:
    argocd.argoproj.io/sync-wave: "5"
spec:
  sources:
    - secret:
        name: linkerd-trust-anchor # the sealed-secret
        key: tls.crt
  target:
    namespaceSelector:
      matchLabels:
        kubernetes.io/metadata.name: "linkerd"
    configMap:
      metadata:
        annotations:
          argocd.argoproj.io/sync-wave: "5"
      key: ca-bundle.crt
The identity issuer certificate files are generated inside the cluster and rotated automatically by cert-manager. Trust-manager ensures all pods have access to the trust anchor to verify the rotating Identity Issuer.
Our Linkerd certificates have been declared in Kubernetes manifests and are ready to be managed by cert-manager within the remote clusters. We can now deploy the Linkerd control plane. We'll add the directories containing the Kubernetes manifests for the linkerd-certificates and an ApplicationSet for the Linkerd control plane.
The applicationsets/linkerd-control-plane/linkerd-control-plane.yml manifest defines the linkerd-control-plane ApplicationSet.
apiVersion: argoproj.io/v1alpha1
kind: ApplicationSet
metadata:
  name: linkerd-control-plane
  namespace: argocd
  annotations:
    argocd.argoproj.io/sync-wave: "6"
spec:
  generators:
    - clusters:
        selector:
          matchLabels:
            linkerd: "enabled"
  template:
    metadata:
      name: 'linkerd-control-plane-{{name}}'
    spec:
      project: default
      source:
        repoURL: https://github.com/linkerd/linkerd2.git
        targetRevision: edge-26.8.3
        path: charts/linkerd-control-plane
        helm:
          releaseName: linkerd-control-plane
          values: |
            linkerdVersion: edge-26.8.3
            identity:
              externalCA: true
              issuer:
                scheme: kubernetes.io/tls
      destination:
        server: '{{server}}'
        namespace: linkerd
      syncPolicy:
        automated:
          prune: true
          selfHeal: true
        syncOptions:
          - CreateNamespace=true
          - ServerSideApply=true
In a file named pki/linkerd-issuers/kustomization.yml, create a kustomization file that will manage the namespace.yml and linkerd-certificate-manifests.yml files as resources in the clusters.
apiVersion: kustomize.config.k8s.io/v1beta1
kind: Kustomization

resources:
  - namespace.yml
  - linkerd-certificate-manifests.yml
The pki/linkerd-issuers/namespace.yml manifest will deploy the linkerd namespace.
apiVersion: v1
kind: Namespace
metadata:
  name: linkerd
  labels:
    linkerd: "enabled"
  annotations:
    argocd.argoproj.io/sync-wave: "1"
Add the applicationsets/linkerd-control-plane.yml manifest and pki/linkerd-issuers/ directory to your Git repository.
git add applicationsets/linkerd-control-plane/linkerd-control-plane.yml
git add pki/linkerd-issuers
git commit -m "deploy Linkerd via Argo CD"
git push
This will instruct Argo CD to track and reconcile all yaml files under the appliationsets and pki/linkerd-issuers directories. After a few minutes, the Linkerd control plane will be deployed and be ready for further configuration to set up a full service mesh for the Kubernetes clusters.
Monitoring and observing multicluster Argo CD Syncs
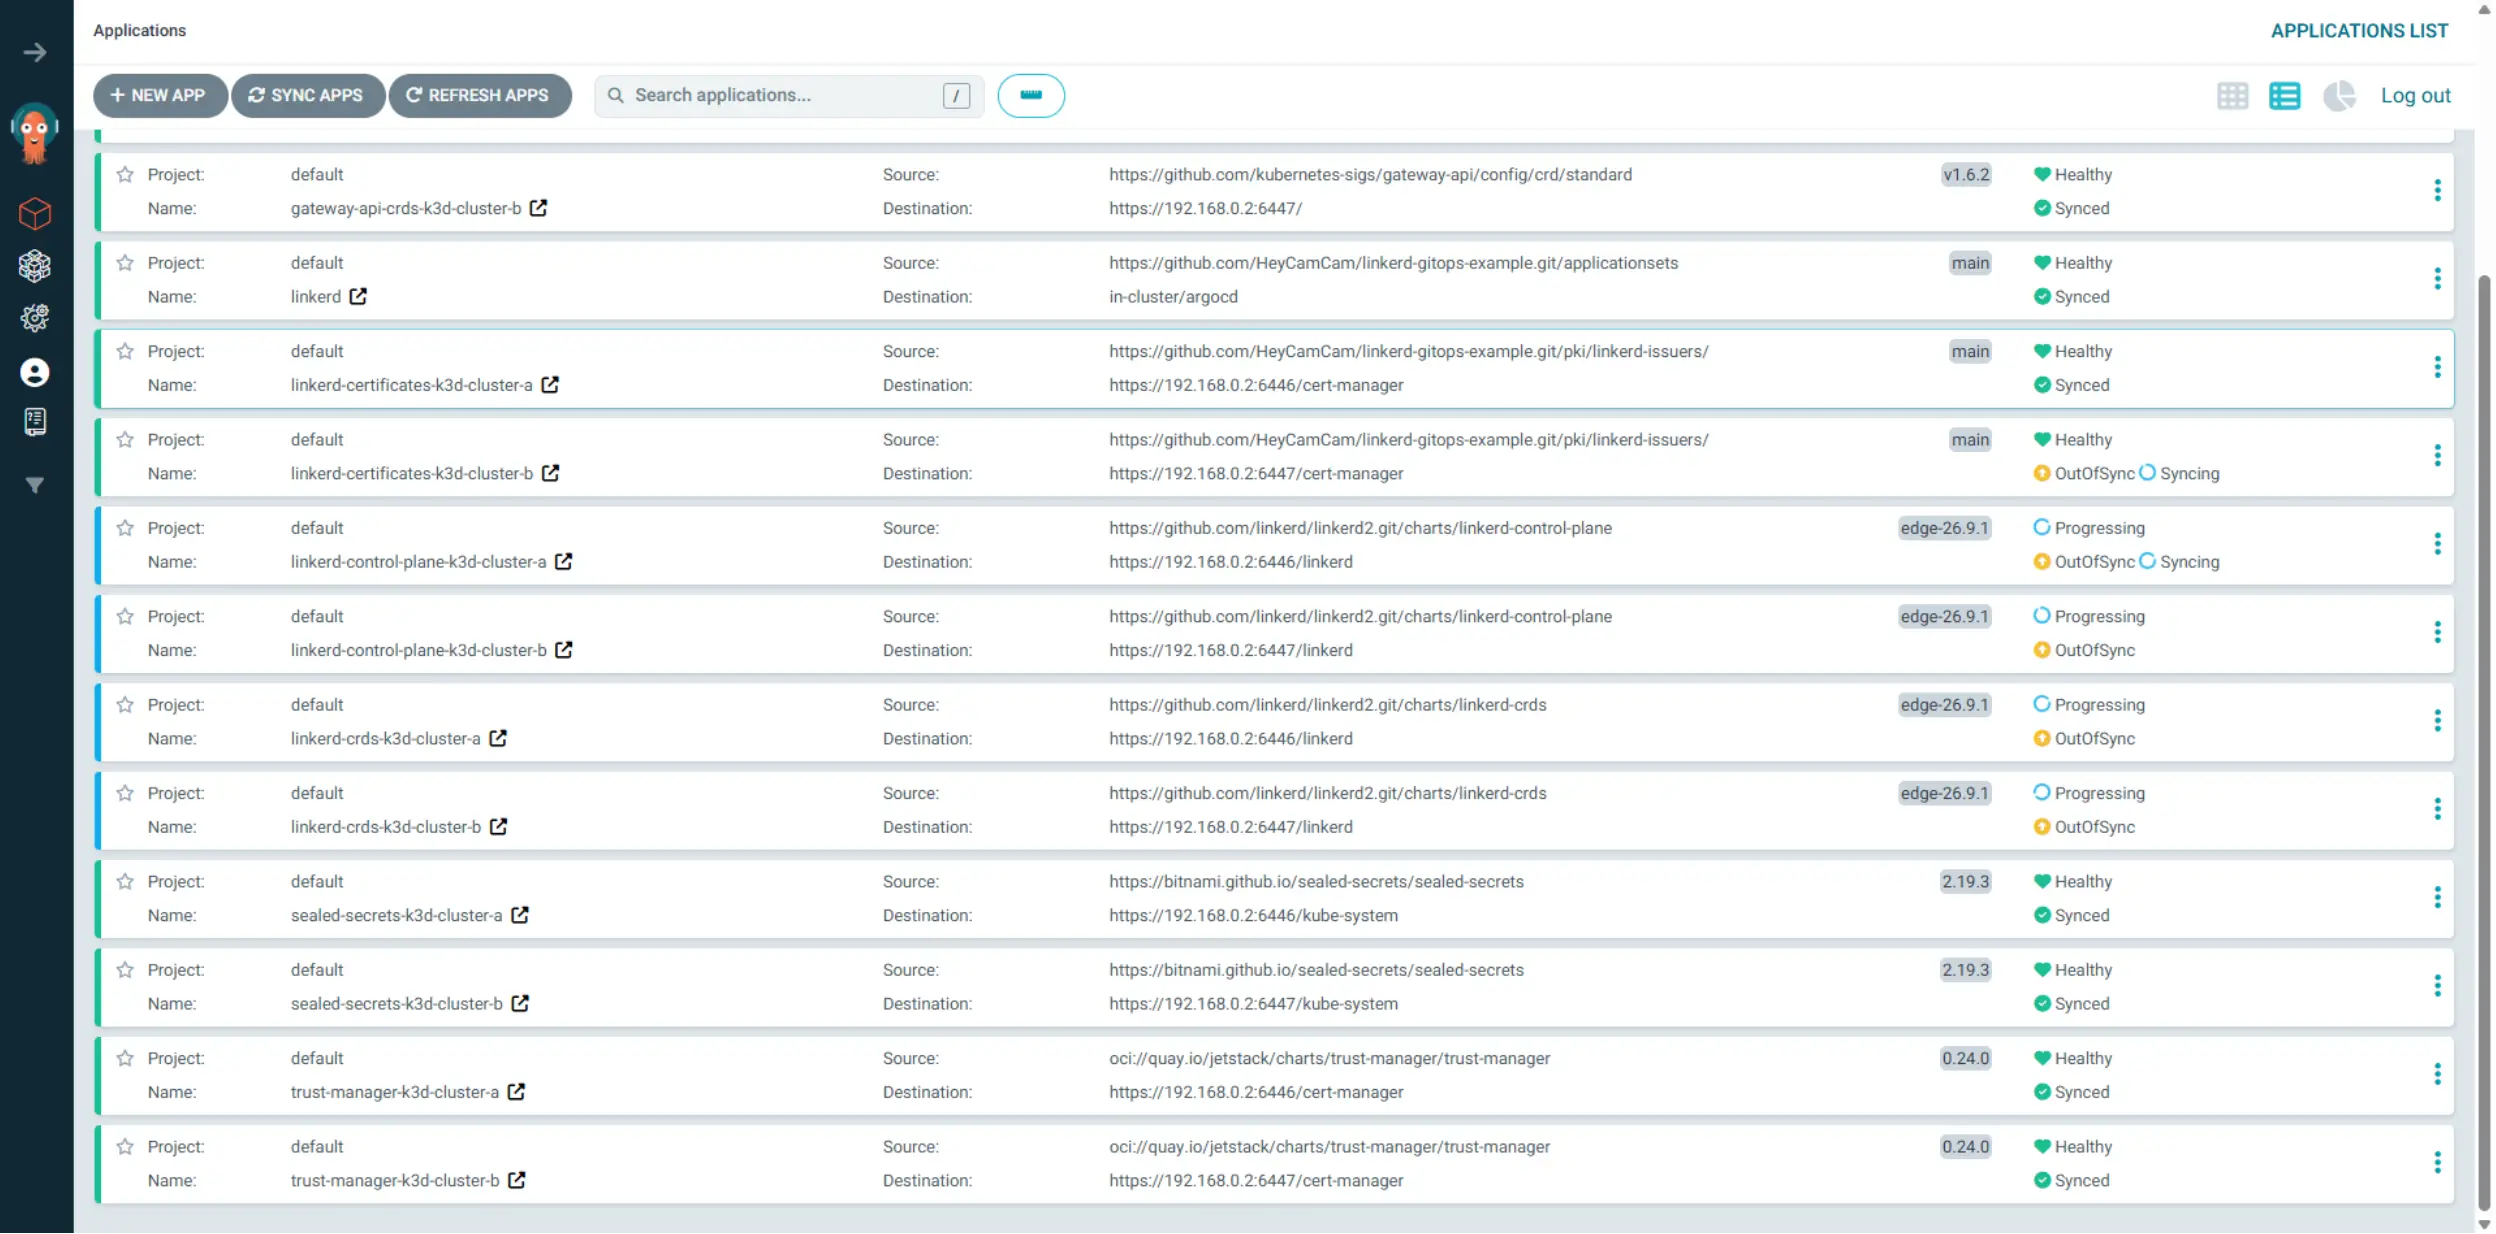
Using the Argo CD applications view
Here we can see every Argo Application on one screen, so during a sync, you can confirm the ApplicationSets reconciled Linkerd across the whole fleet without opening each Application. It's the fastest way to see which Application on which cluster is still mid‑sync, drifted, or degraded.
Analyzing live resources with the Argo CD network view
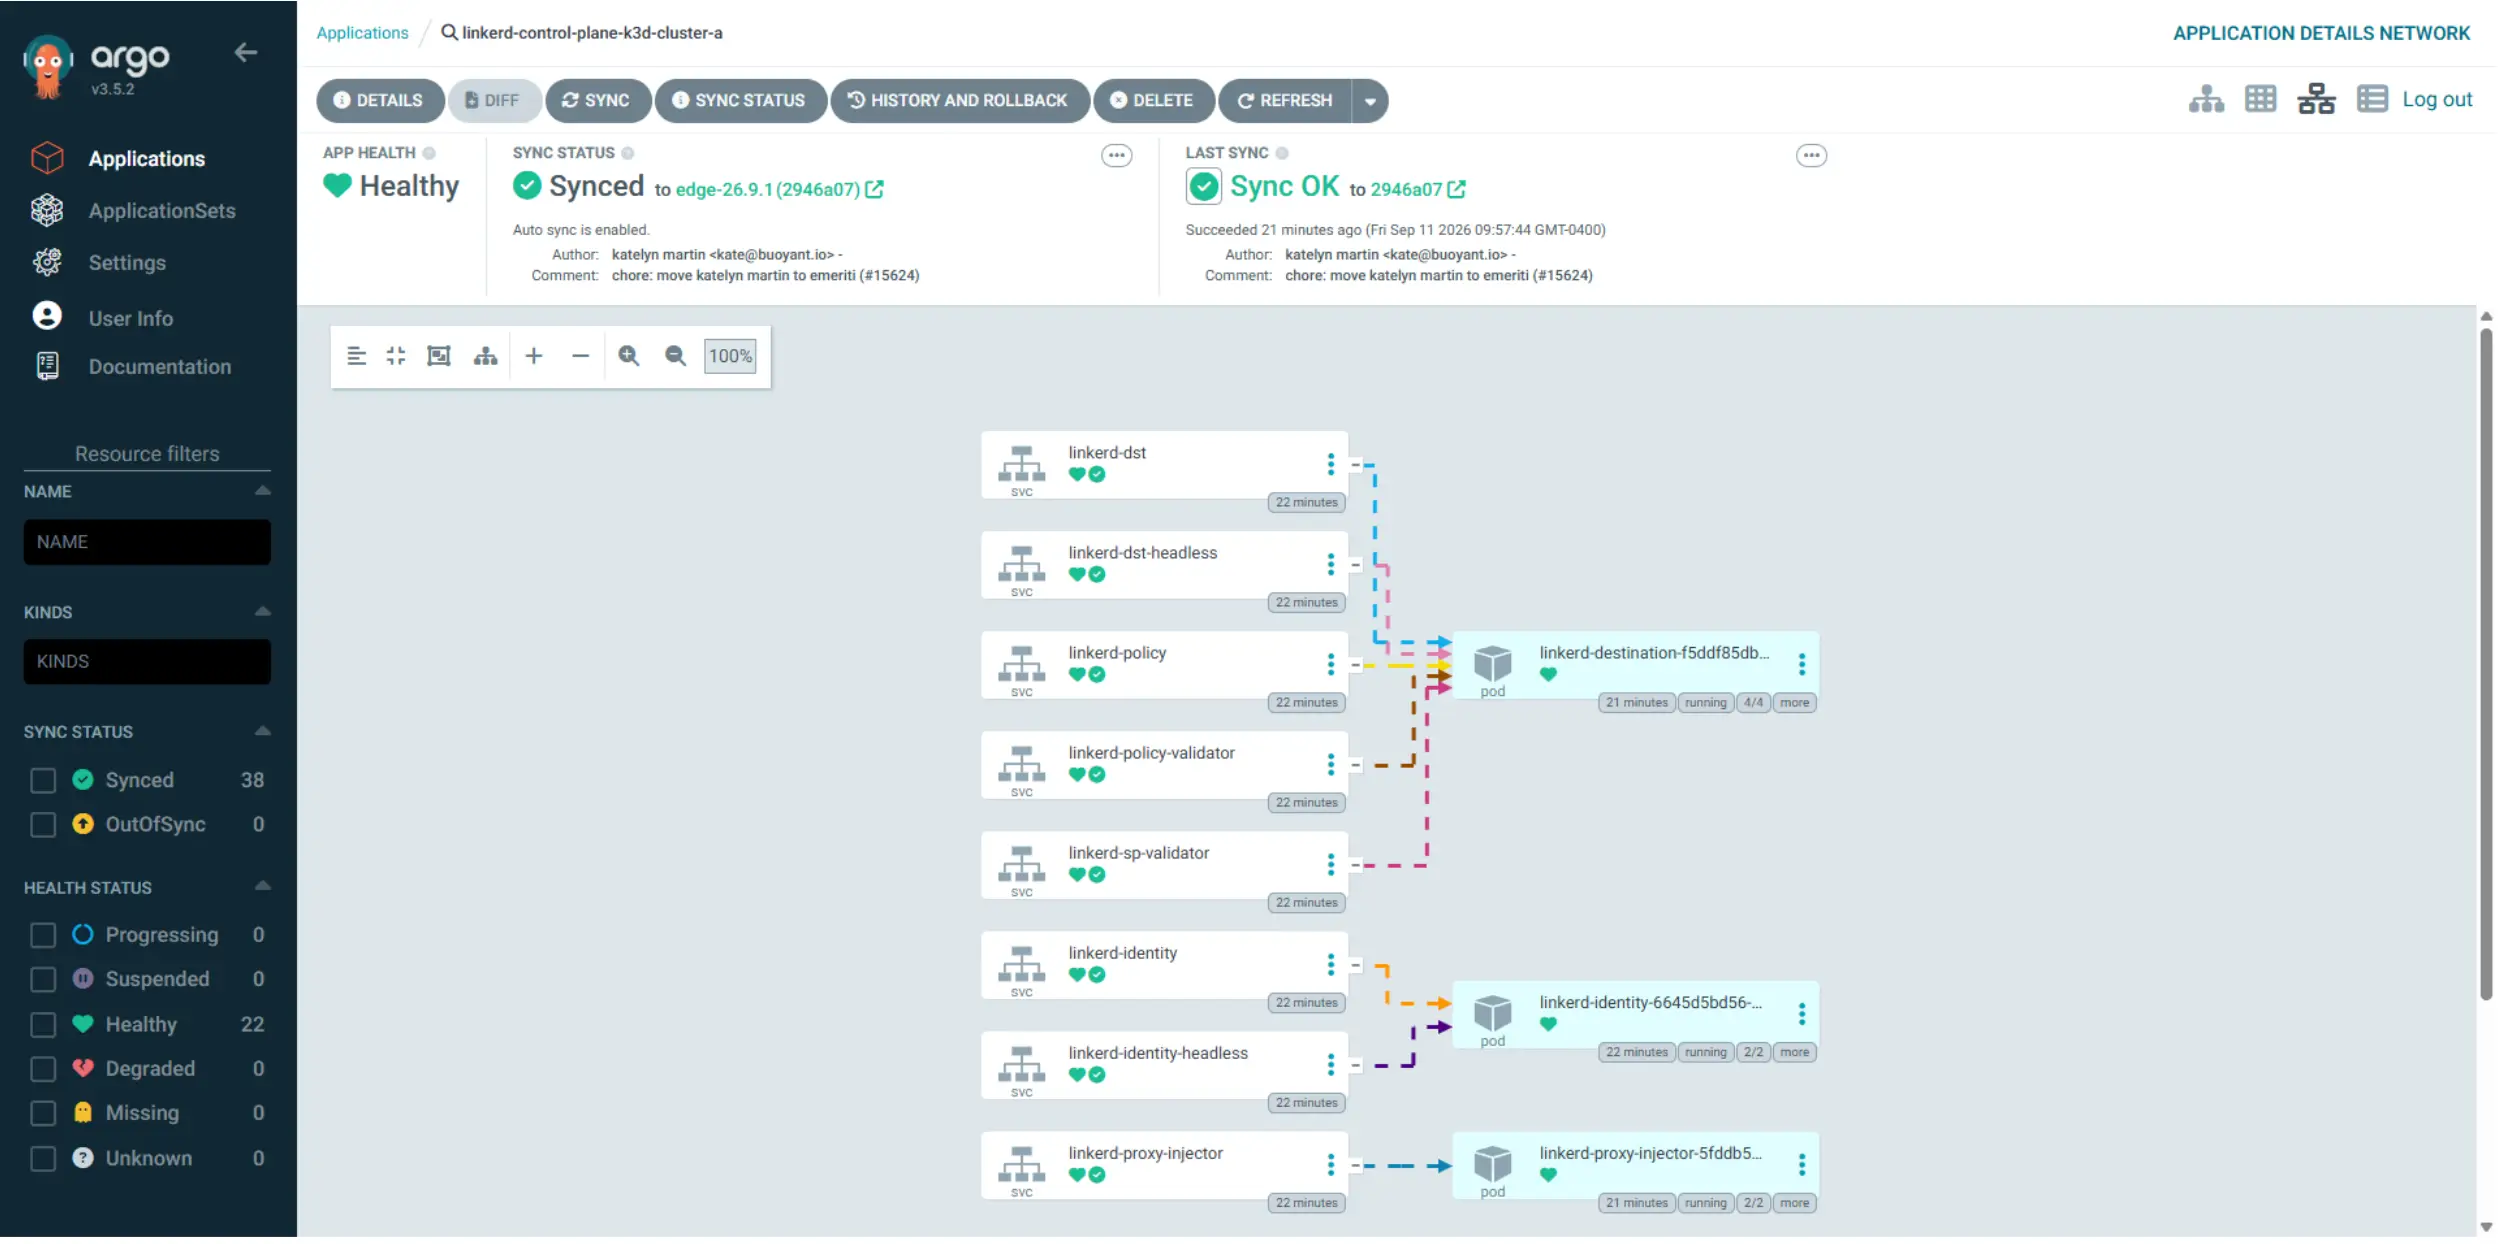
In the network view, you can see the application's live resource map. During a sync, this view lets you watch each managed object update in real time. The header shows the overall app health (Healthy in this case), sync status (Synced to edge-26.9.1, auto-sync enabled), and last sync. Each card displays its own health and sync badge, and the counters on the left (Synced 38, Healthy 18) increase as resources move from OutOfSync to Synced and from Progressing to Healthy. This is the screen to keep open if you want to watch the entire rollout complete.
Reviewing Argo CD sync operation results
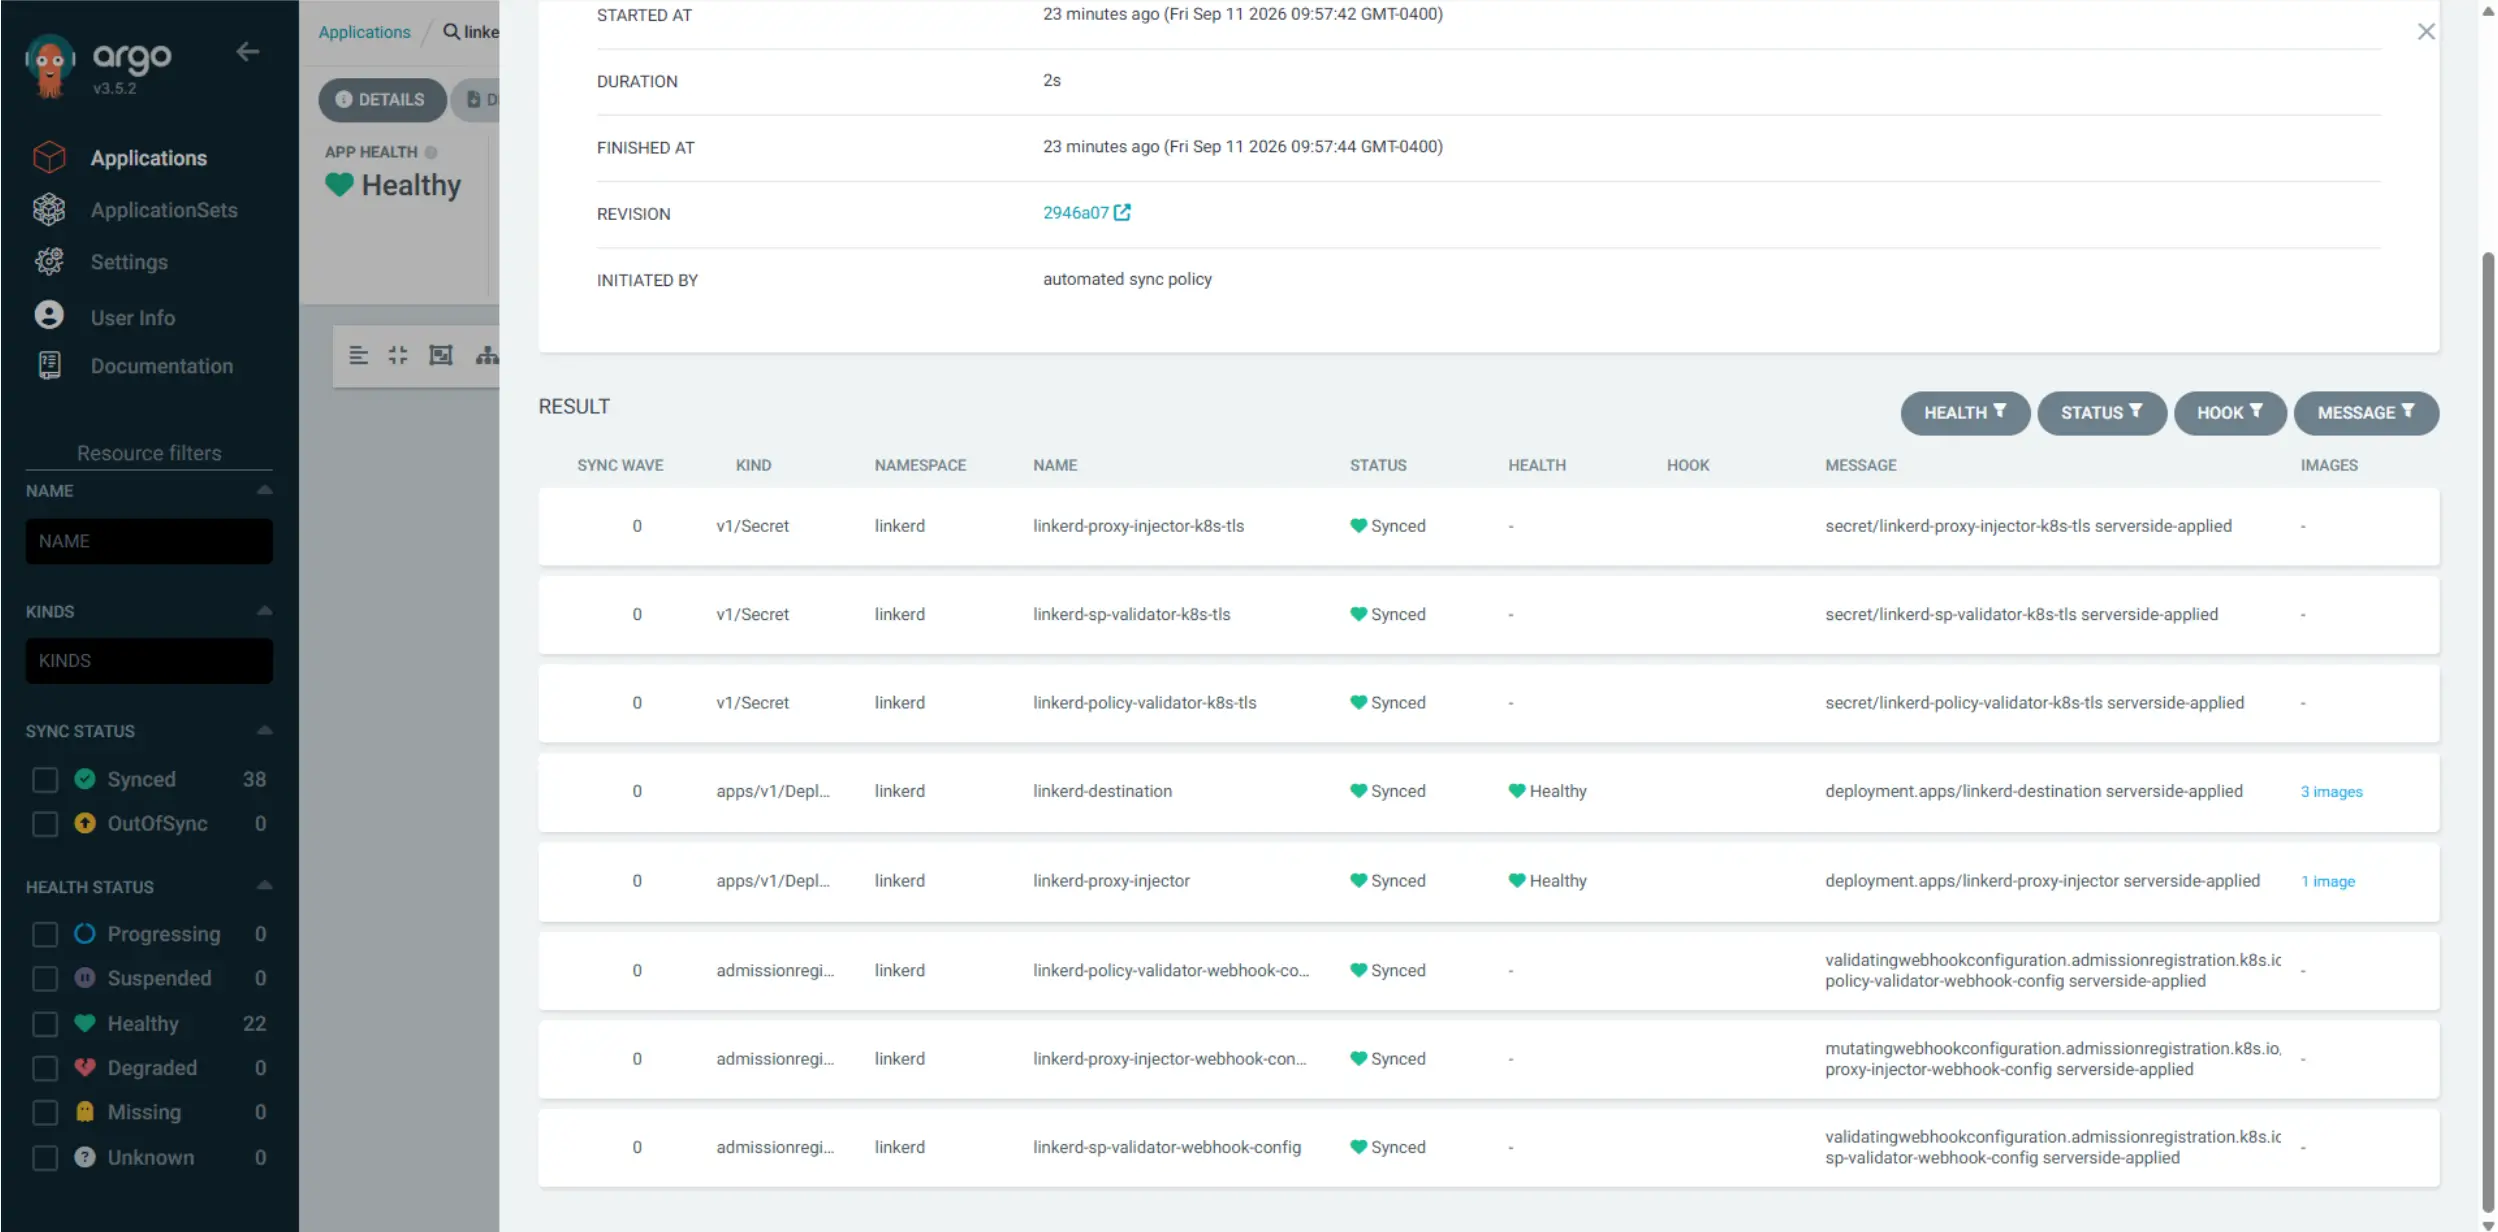
The sync result is the main record of what happened during the sync operation. Here, you can check the type of operation, how it finished, how long it took, which revision was used, and what triggered it. The Result table lists each resource involved in the sync, showing details such as sync wave, kind, status, health, hook, and a message for each object. If a sync fails, this screen shows you exactly which resource had an issue and why.
Troubleshooting with the resource events tab
In the events tab, we can see the Kubernetes timeline for that object as it starts up. This helps explain why a sync might be slow or stuck. In this example, we can see which images are being pulled, and when each container is created and started. If the application summary shows a status like Progressing or Degraded, you can find the real cause here, such as ImagePullBackOff, a crash loop, or an unschedulable pod, instead of having it hidden behind the overall health status.

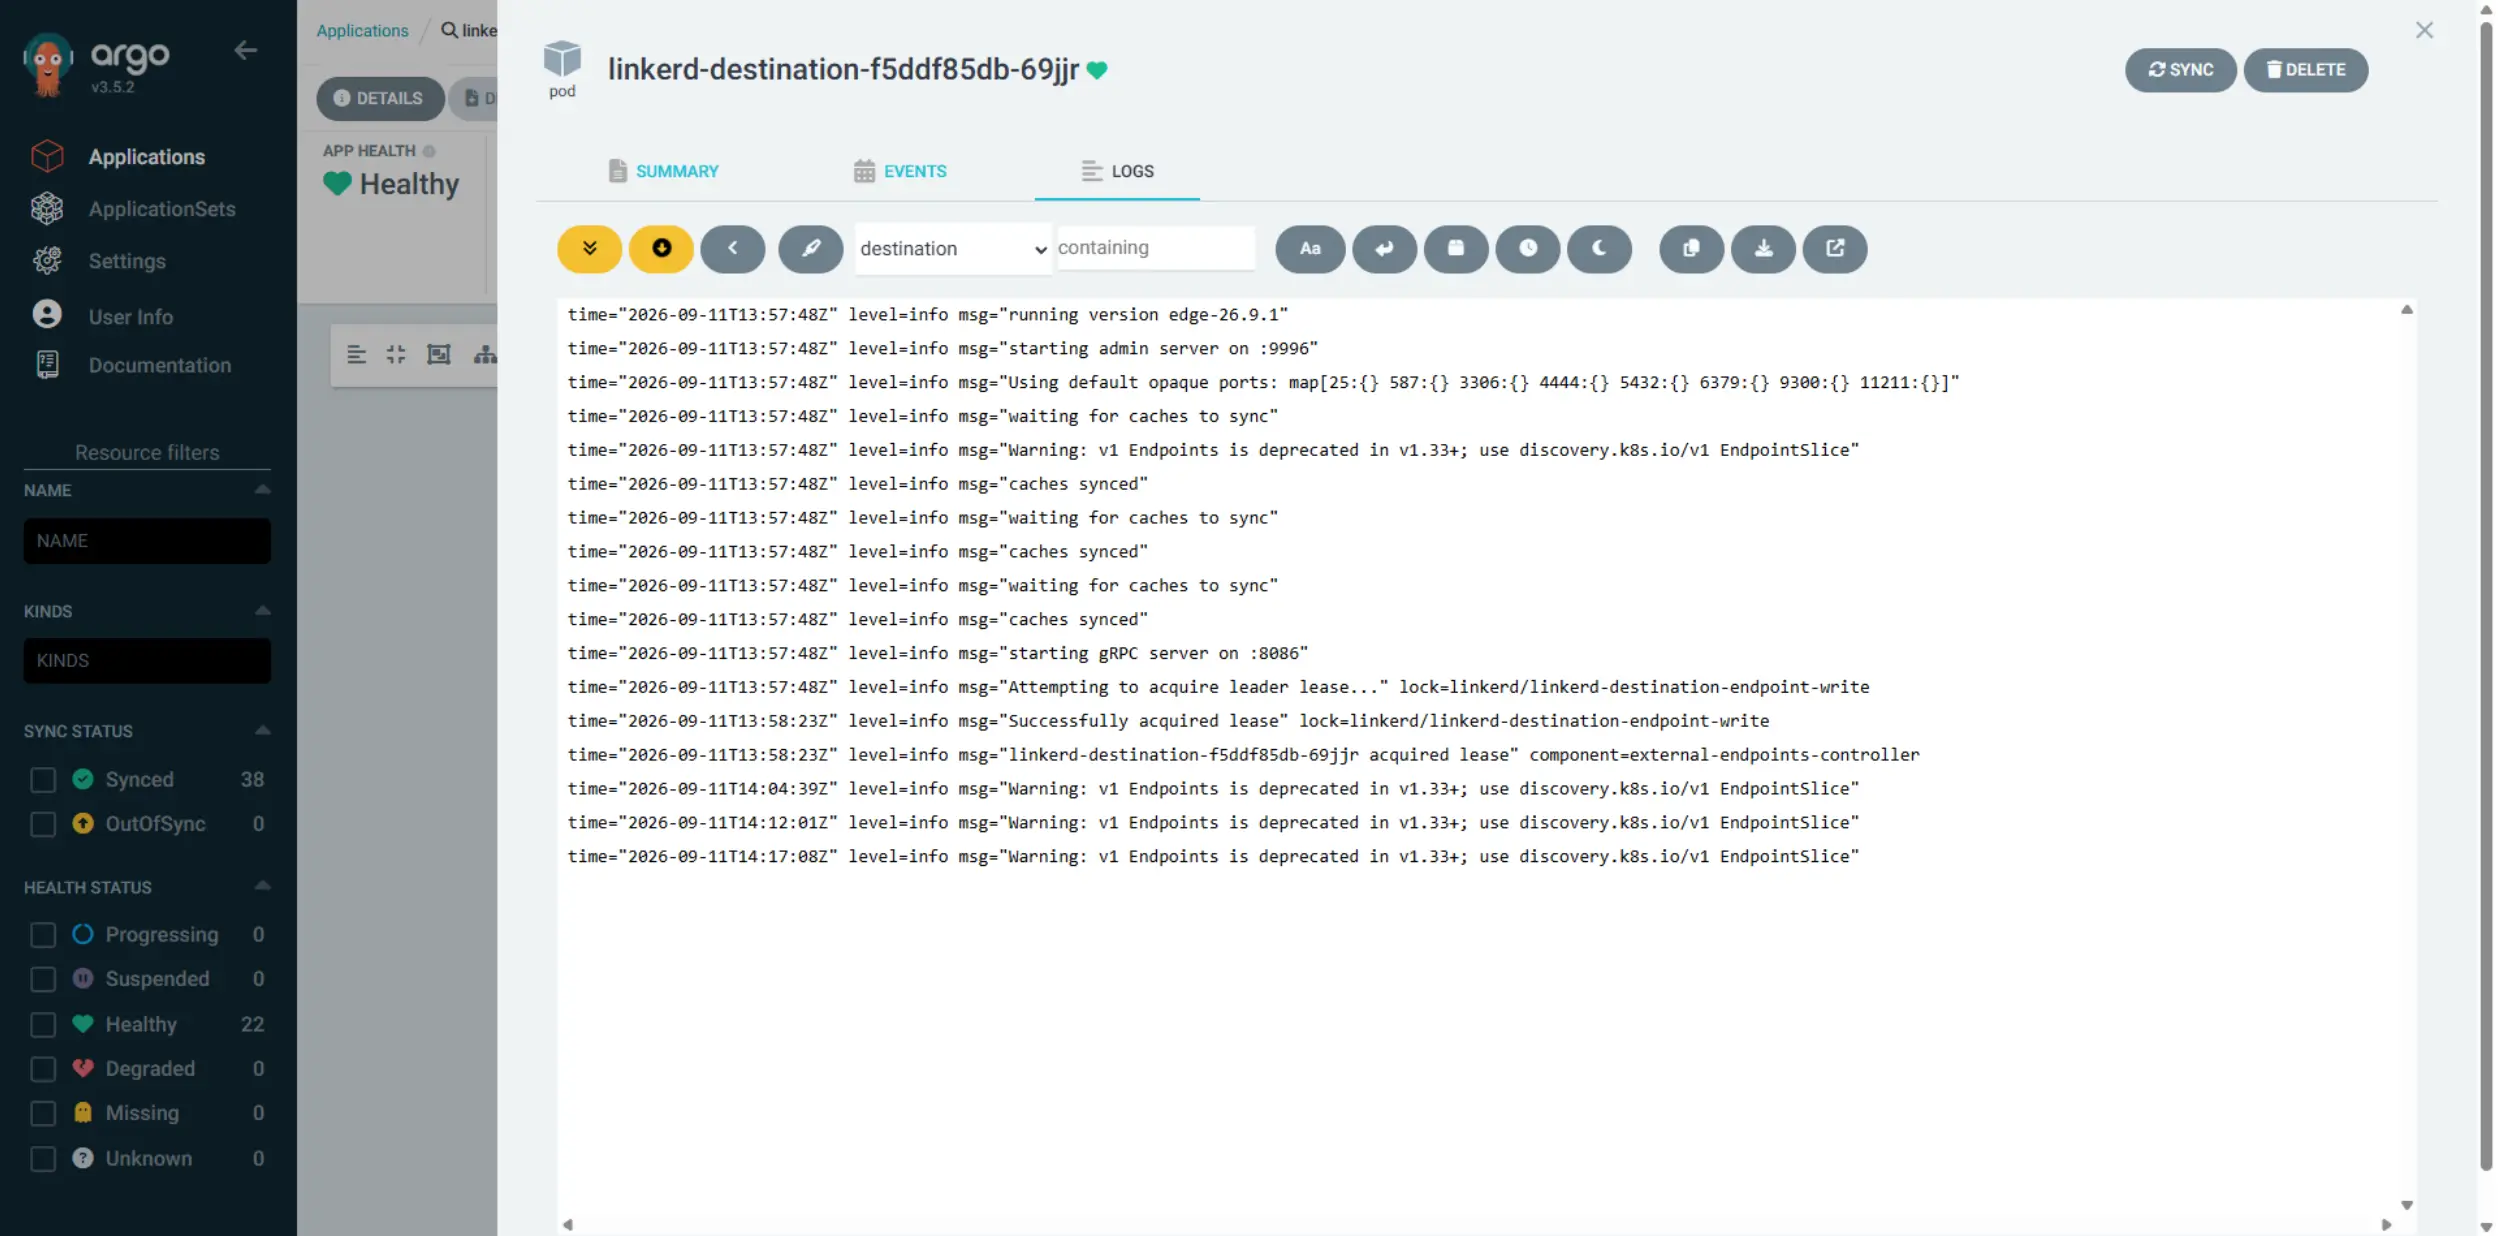
Streaming and debugging via the resource logs tab
In case we need to get deeper into the rabbit hole, the Logs tab streams will allow you to verify during and after a sync that what Argo delivered is genuinely working rather than merely present.
Detecting and reverting configuration drift with Argo CD
What happens if a manual change is made to a resource outside of Argo CD? Let's test this by deleting the Linkerd namespace from one of the clusters to see what happens.
Here's the Argo CD Application page before removing the namespace. Note the status of the linkerd-certificates and linkerd-control-plane applications for k3d-cluster-a:

Let's delete the Linkerd namespace.
kubectl delete ns linkerdOh no! Our entire Linkerd namespace has been removed. If we deployed all resources under the Linkerd namespace using kubectl commands, it could potentially require manual intervention to stand everything back up. Since we used a GitOps strategy, Argo CD (specifically the Application controller) noticed two managed resources from k3d-cluster-a drifted from their desired state and automatically started the process of bringing them back to what is declared in Git!
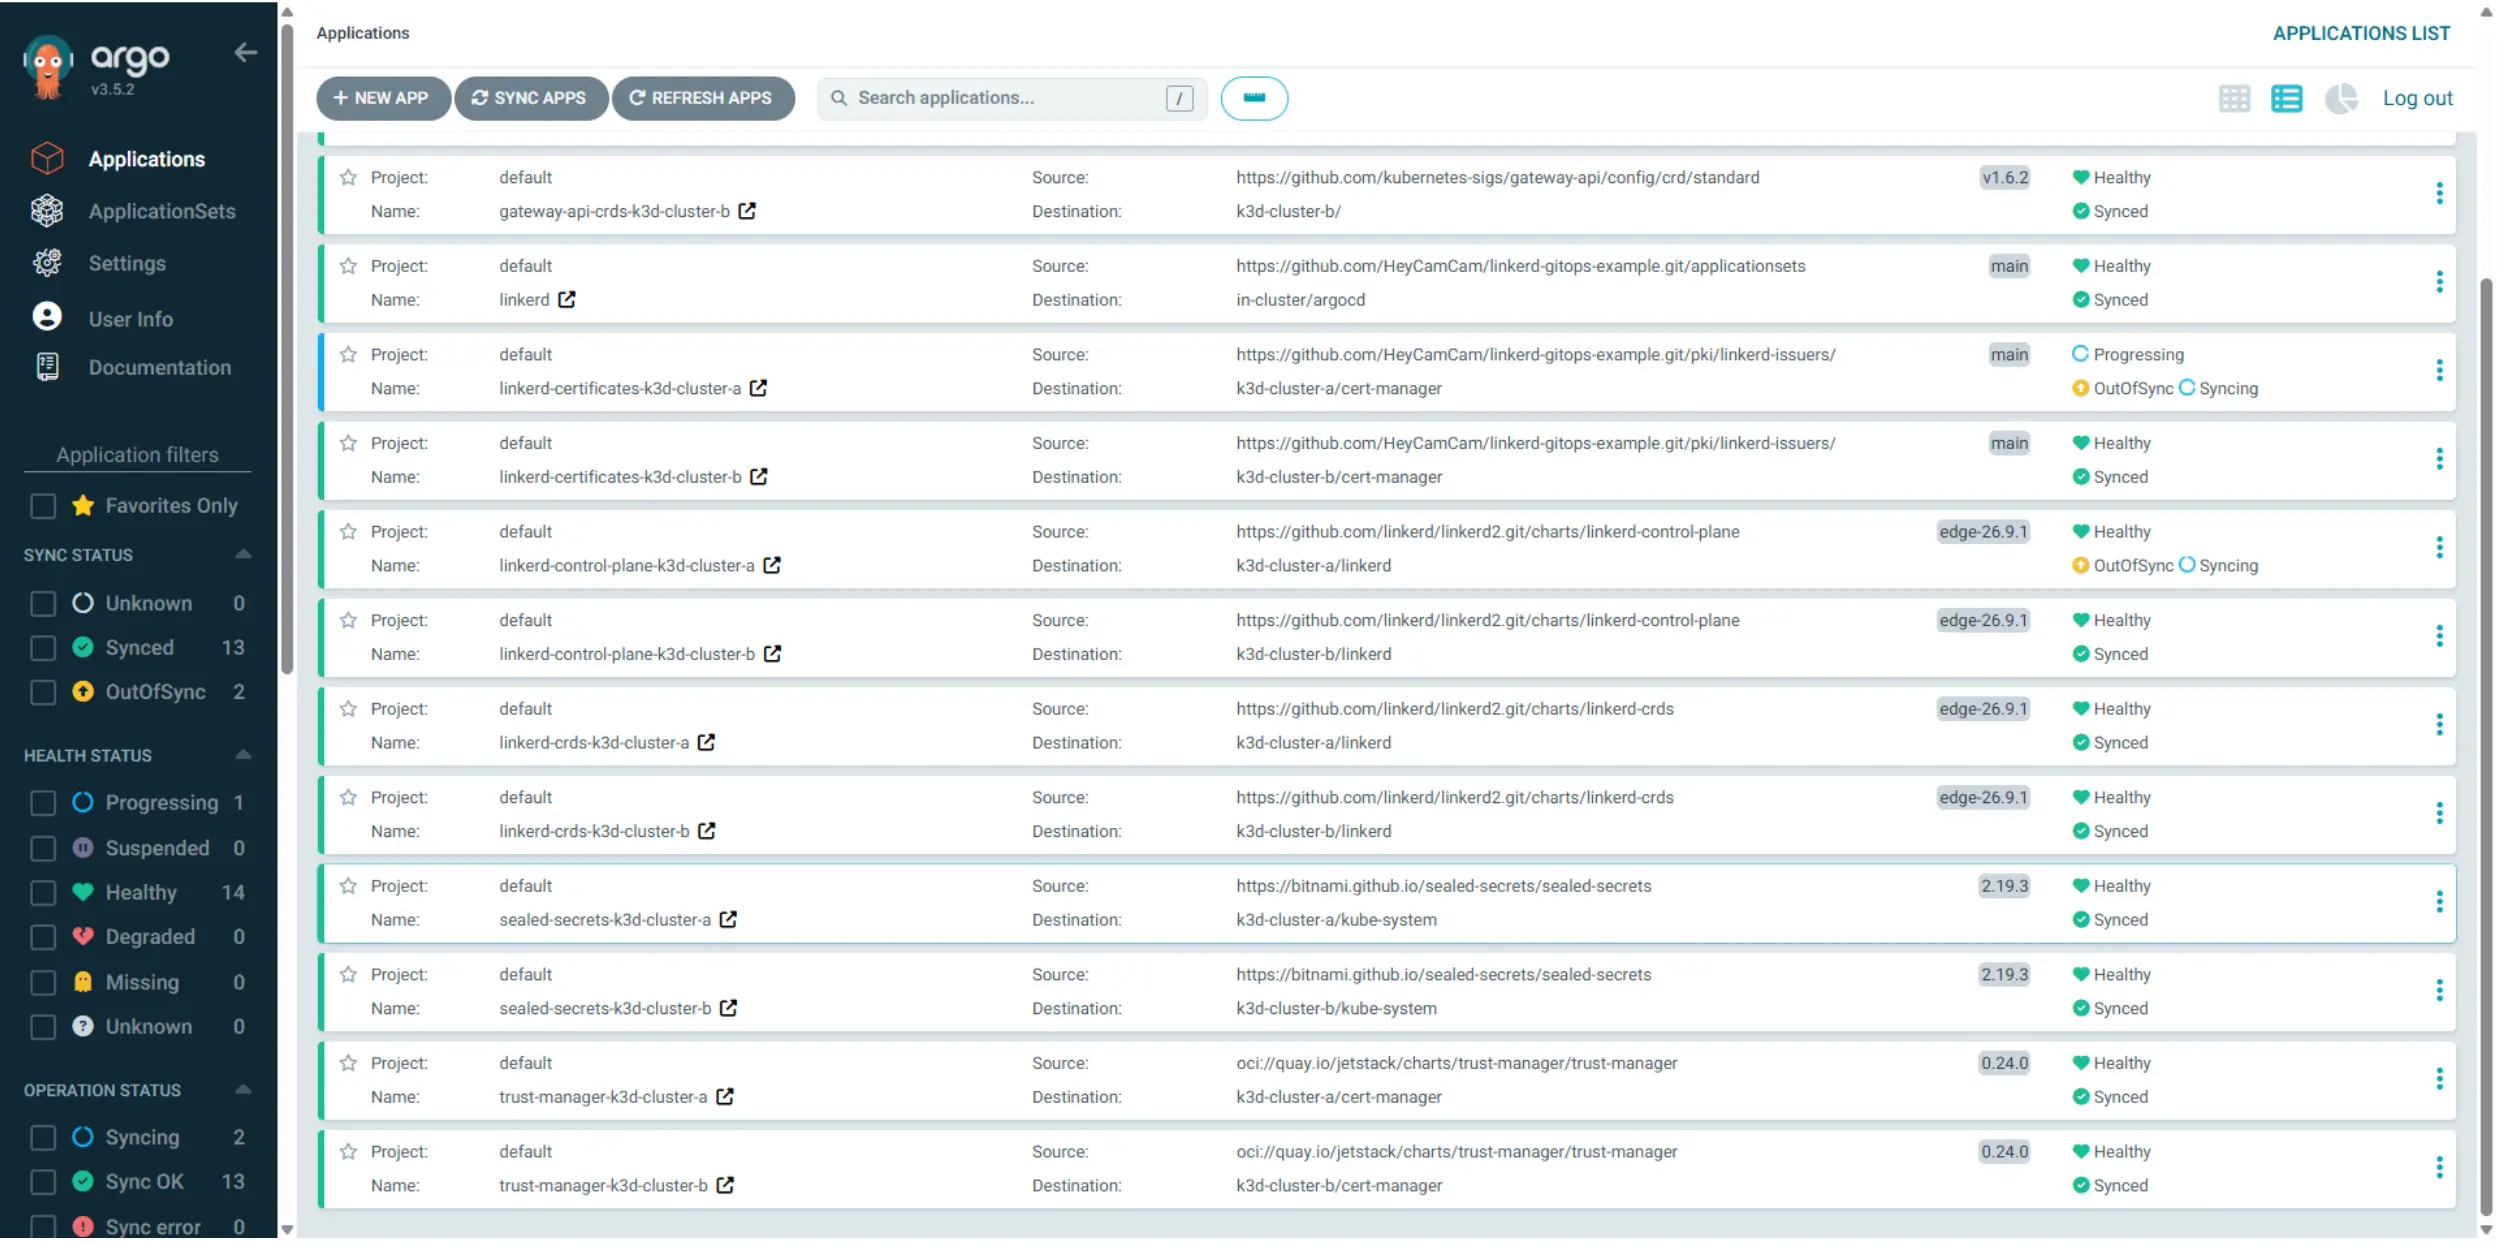
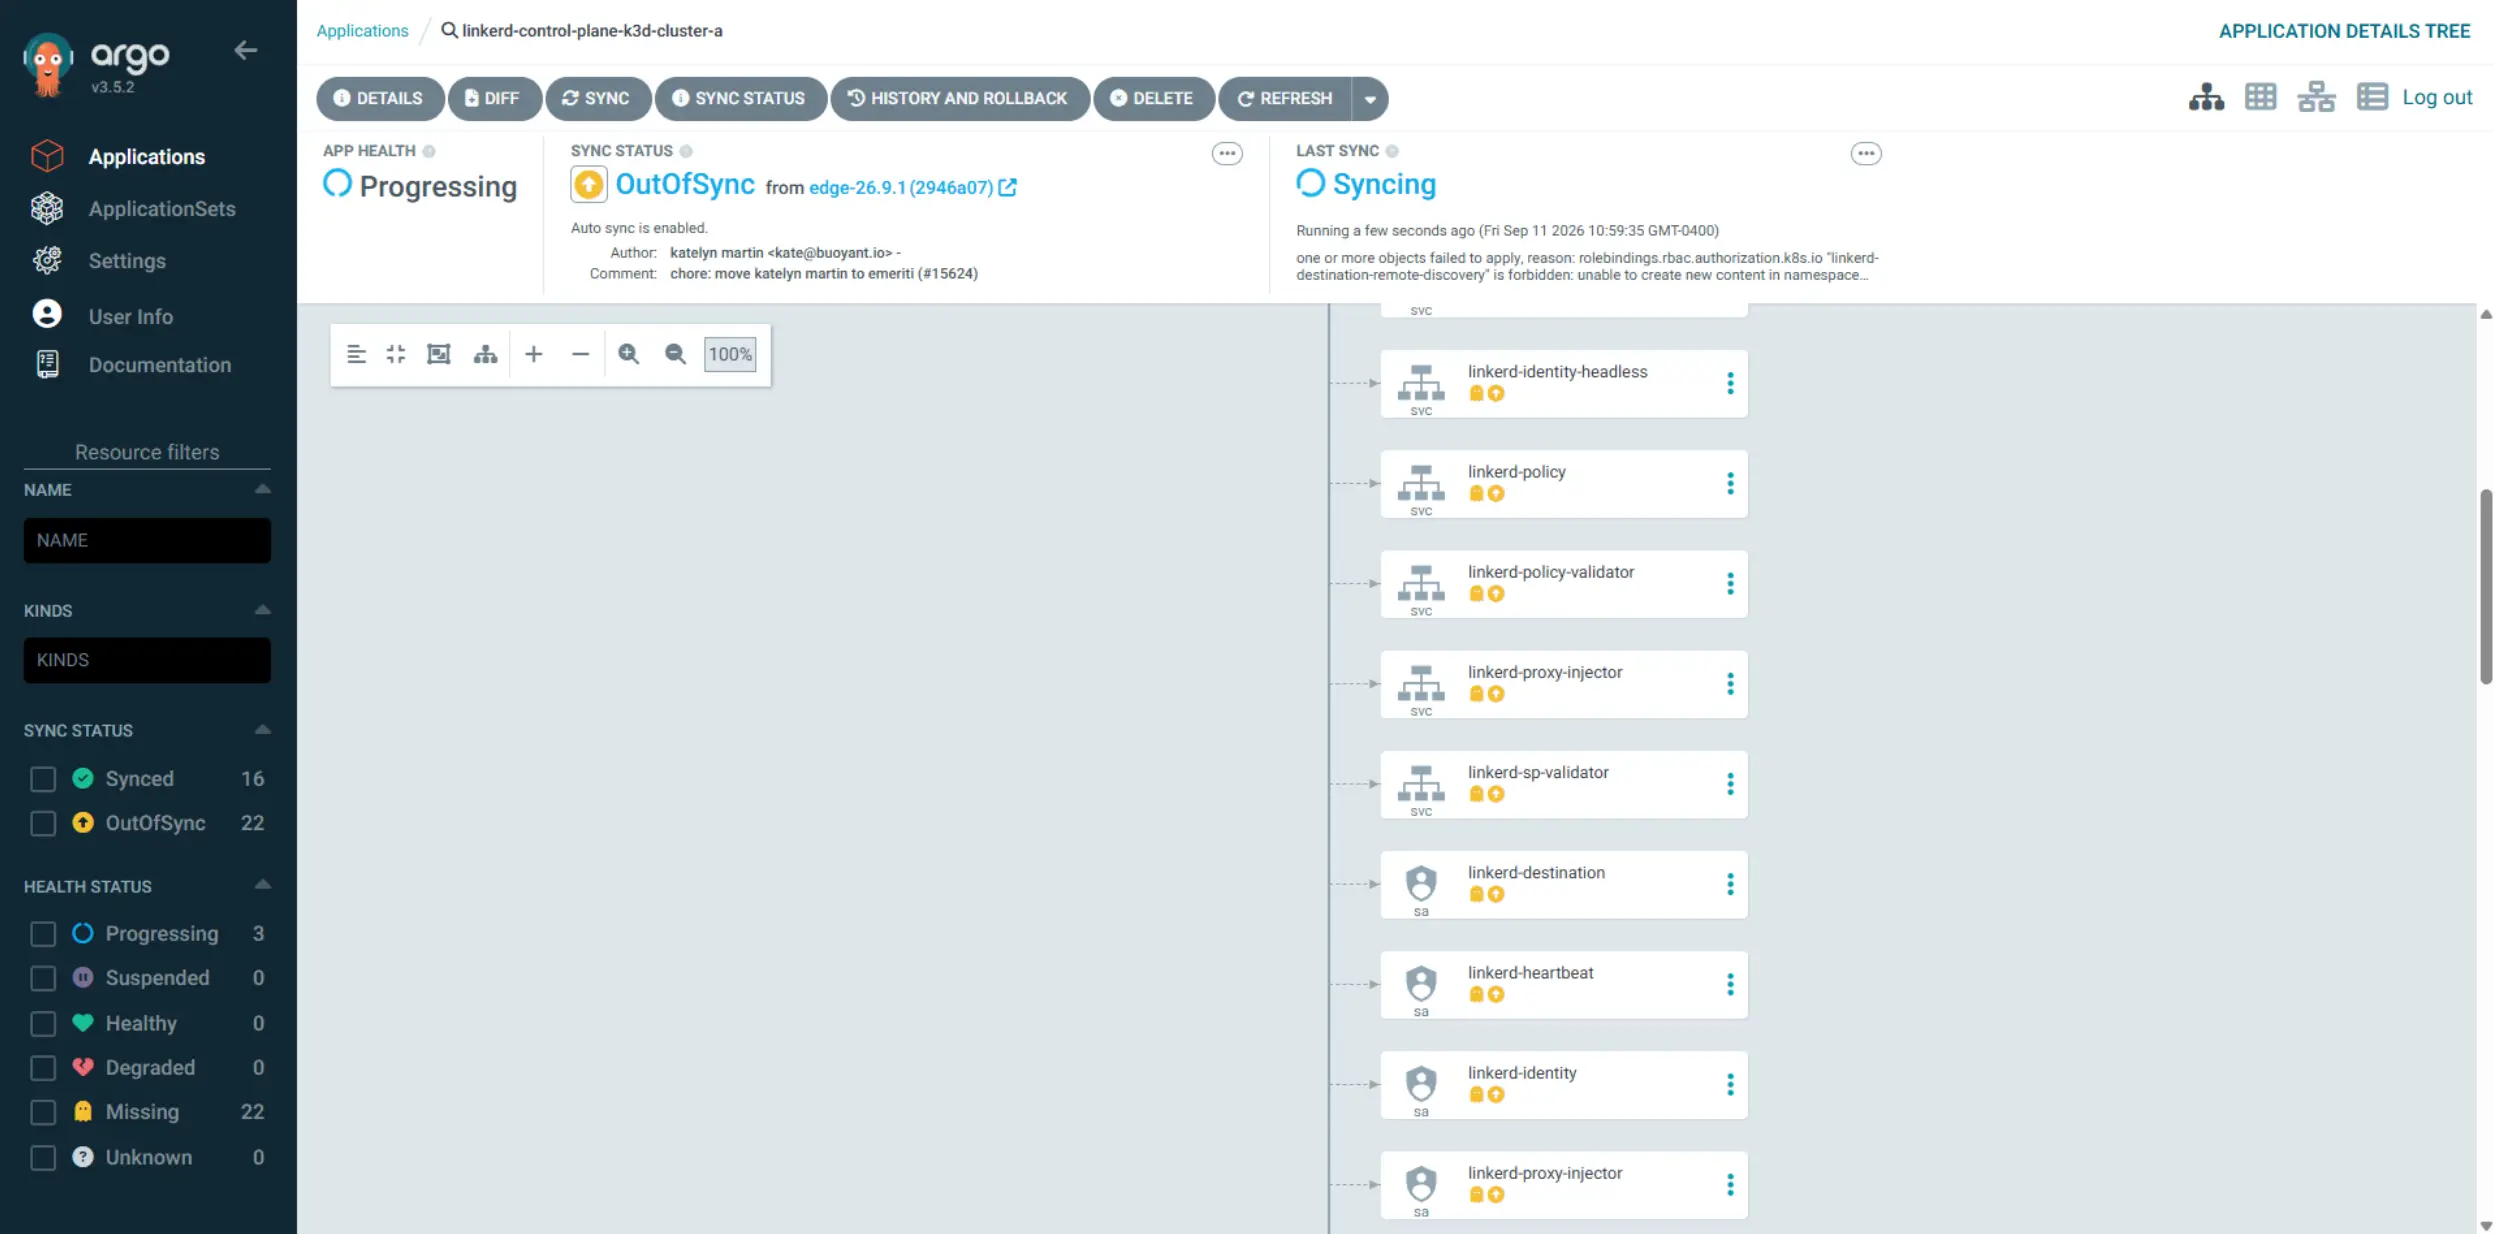
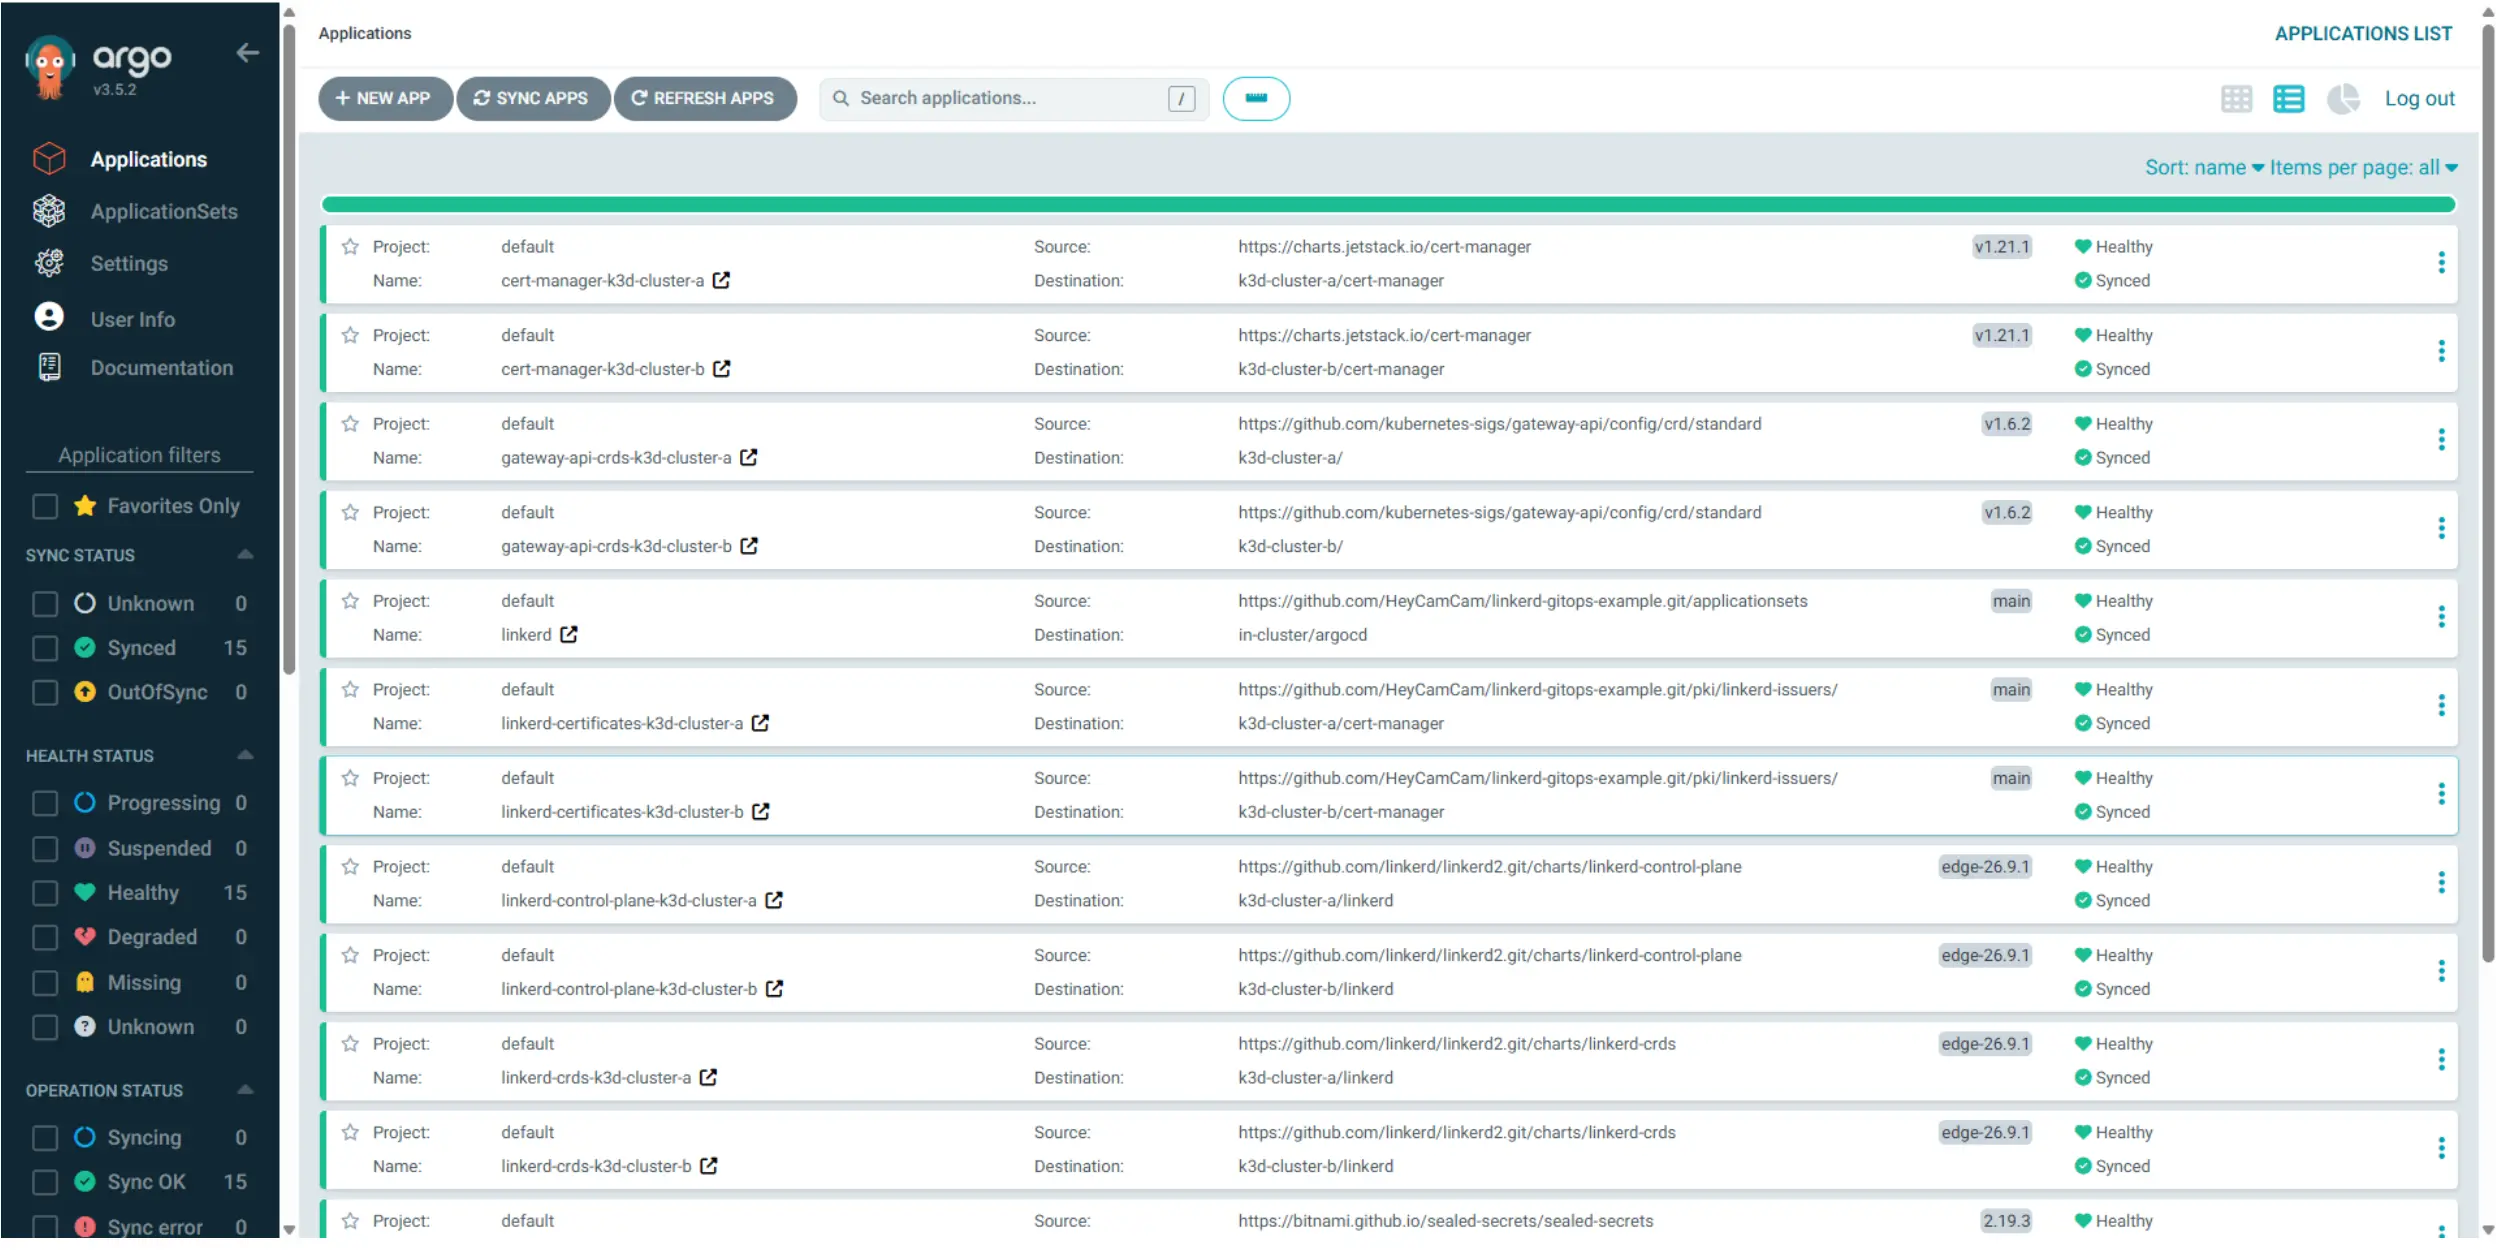
After some time, and with no manual intervention, Argo CD has the managed resources fully running again.
Streamlining service mesh operations with GitOps
We demonstrated how to use Argo CD to declaratively deploy the Linkerd service mesh. We also simulated a scenario where the Linkerd namespace was removed, and watched Argo CD automatically redeploy the needed resources. Using GitOps for Linkerd management is helpful when you need consistent multi-cluster deployments, certificate lifecycle management, auditable changes, and drift detection. This approach turns Linkerd from a collection of kubectl commands into a versioned component that can be reviewed and reproduced.
FAQ
How do you deploy Linkerd with Argo CD?
You define Linkerd's CRDs, control plane, and prerequisites (cert-manager, trust-manager, Sealed Secrets, and Gateway API CRDs) as Argo CD ApplicationSets in Git. A cluster generator targets every cluster labeled linkerd=enabled, and sync waves control the install order.
How do you manage Linkerd certificates with GitOps?
Commit the trust anchor to Git as a sealed secret, sealed separately for each cluster. cert-manager then issues and rotates the identity issuer certificate inside each cluster, and trust-manager copies the trust anchor's public cert into the linkerd namespace.
Should the Linkerd trust anchor private key be stored in the cluster?
Not in production. Our walkthrough keeps it in the cluster for simplicity, but a better setup stores it in an external PKI such as HashiCorp Vault and configures cert-manager to pull it from there.
What happens if someone deletes the Linkerd namespace in a GitOps setup?
Argo CD's application controller sees that managed resources have drifted from the state declared in Git and redeploys them automatically. In our test, deleting the linkerd namespace on 1 cluster led to a full recovery with no manual steps.
Why use GitOps to manage Linkerd instead of linkerd install?
Running linkerd install piped to kubectl apply leaves no record of which version, certificates, or optional components you deployed. With GitOps, all of that lives in Git, so your team can review changes, reproduce installs across clusters, and let Argo CD correct drift.